Sunday, December 3, 2023

Resolving "Valid value for rootItemId not provided" Error in Sitecore XP and Nex.jss Setup


Recenlty, I encountered an error that might be familiar to Sitecore XP and Nex.jss users: "Error: Valid value for rootItemId not provided and failed to auto-resolve app root item." In this blog post, I'll share the solution to this issue, providing step-by-step guidance to address it.


The Error: Upon initiating the client setup, the mentioned error surfaced, indicating a missing or incorrectly configured rootItemId. The solution to this problem lies within the Sitecore environment, specifically in the site group settings.

Solution Steps: To resolve the "Valid value for rootItemId not provided" error, follow these steps:

Access Sitecore CMS:

Log in to your Sitecore Content Management System.

Navigate to Site Group Settings.

Go to the following location in the Content Editor: /sitecore/content/MainSite/Site1/Settings/Site Grouping/Site1.

Locate the app name field:

Once you're on the designated path, look for the field related to the application name. This is crucial for resolving the error.

Update the app name:

Provide the correct name for the app in the designated field. Ensure accuracy and consistency with your application settings.

Save Changes:

After updating the app name, save the changes in Sitecore. This step is essential for the changes to take effect.

Rebuild and deploy:

Depending on your setup, consider rebuilding and redeploying your Sitecore and Nex.js applications to ensure that the changes are reflected.

Verify the fix:

Finally, revisit your application and confirm that the error no longer persists. If configured correctly, the rootItemId issue should be resolved.

Conclusion: By following the outlined steps, you can successfully address the "Valid value for rootItemId not provided" error in Sitecore XP and Nex.jss setups. Keep in mind the importance of accurate app naming in the Site Group Settings, as this directly impacts the resolution of the issue.

Saturday, November 18, 2023

TypeError: Cannot read properties of undefined (reading 'parents')


During the deployment of a Next.js application, you may encounter the error 'TypeError: Cannot read properties of undefined (reading 'parents')'. This error indicates that the code is attempting to access a property named 'parents' on an object that is undefined.

Cause of the Error

The error typically arises when the code expects an object to have a 'parents' property, but the object is either undefined or does not have that property. This can happen due to various reasons, such as:

  • Incorrect or missing layout path: The layout path might be incorrect, leading to the inability to load the required components and resulting in undefined objects.

  • Data fetching issues: If the code relies on data fetched from an API or other sources, any issues in fetching or processing the data can lead to undefined objects.

  • Component rendering errors: Errors in component rendering can cause unexpected behaviour and result in undefined objects.

Resolving the issue

To resolve this error, you can follow these steps:

  1. Verify Layout Path: Double-check the layout path to ensure it is correct and points to the intended location of the layout component.

  2. Inspect Data Fetching: Check if the data fetching process is working correctly and that the fetched data is being properly parsed and assigned to the appropriate variables.

  3. Review Component Rendering: Review the component rendering logic to ensure that the components are being rendered correctly and that there are no errors that might be causing unexpected behaviour.

Alternative Approaches

In addition to the above steps, you can also consider alternative approaches to address the error:

  • Conditional Rendering: Implement conditional rendering to check if the object is undefined before attempting to access its properties.

  • Default Values: Provide default values for the object's properties to prevent undefined values from causing errors.

  • Error Handling: Implement robust error handling to gracefully handle undefined objects and prevent the application from crashing.

Conclusion

The 'TypeError: Cannot read properties of undefined (reading 'parents')' error can be resolved by carefully examining the layout path, data fetching, and component rendering logic. 

In my case I did two things, One is updated the Layout path and publish the items and second is Implemented conditional rendering considerig the experience editor mode.

Wednesday, November 15, 2023

Mastering Environment Management in Sitecore XM Cloud: A Comprehensive Guide

Sitecore XM Cloud empowers organizations to craft personalized and engaging digital experiences. Efficiently managing environments and projects is crucial for successful implementation and maintenance. This technical guide delves into the steps involved in deleting an existing environment and creating a new one within Sitecore XM Cloud.

Deleting an Project: A Step-by-Step Guide

Step 1: Navigating to the Control Panel

Log in to the Sitecore XM Cloud Control Panel.

Seamlessly navigate to the project and  "Environments" section.


it's required that first you delete all the environment and after that you will see option to delete the project.

Step 2: Selecting the Environment for Deletion

Within the "Environments" section, identify the environment you intend to delete.

Click on the environment's name to access its details.

Step 3: Initiating Environment Deletion

Locate the "Delete" option within the environment details.

A confirmation dialog will appear. Confirm the deletion by following the on-screen instructions.    


Option to delete


Creating a New Environment: A Step-by-Step Guide

After deleting an environment or when establishing a new project, creating a new environment is the next step.

I'm going to use the Sitecore CL to setup the project and enviroment, here are some command details

XM Cloud projects are like collections of Sitecore XM environments, allowing you to organize and manage your Sitecore solutions effectively. Embarking on an XM Cloud project is an exciting venture, and I'm here to guide you through the initial steps.

Fist, you need to relogin using the CLI, otherwise you will get below errror 


Step 1: Creating Your XM Cloud Project

Navigate to your project's working directory using the command line.

Execute the following command to create a new XM Cloud project:

dotnet sitecore cloud project create --name <project-name>

Replace <project-name> with a descriptive name for your project.

For instance, to create a project named "MyXMCloudProject," use the following command:

dotnet sitecore cloud project create --name MyXMCloudProject

Note the assigned project ID for future reference.

Tip: To retrieve the project ID at any time, use the following command:


dotnet sitecore cloud project list

Step 2: Creating an Environment for Your XM Cloud Project

Within your project's working directory, open a command-line window.

Execute the following command to create an environment for your project:

dotnet sitecore cloud environment create --name <name> --project-id <project-id>

Replace <name> with a meaningful name for your environment.

Replace <project-id> with the project ID you noted earlier.

For example, to create an environment named "staging" for your project with ID "6btMioN1QDVjSUvQkklkVR," use the following command:


dotnet sitecore cloud environment create --name staging --project-id 6btMioN1QDVjSUvQkklkVR

Note the assigned environment ID for future reference.

Tip: To retrieve the environment ID at any time, use the following command:

dotnet sitecore cloud environment list --project-id <project-id>

Step 3: Deploying Your Solution to the XM Cloud Environment

Within your project's working directory, open a command-line window.

Execute the following command to initiate the deployment process:

dotnet sitecore cloud deployment create --environment-id <environment-id> --upload

Replace <environment-id> with the environment ID you noted earlier.

Example 

dotnet sitecore cloud deployment create --environment-id abc

This command creates a deployment that kicks off immediately and includes all the code in your current working directory.

Tip: To retrieve the environment ID, use the following command:


dotnet sitecore cloud environment list --project-id <project-id>

Once the deployment completes, the command line will display a URL pointing to your XM Cloud Sitecore CM instance. Open the link to access your Sitecore XM Cloud CM instance.

To access the Sitecore Launchpad, append /sitecore to the root URL of the instance in your browser's address bar.

Congratulations! You've successfully created an XM Cloud project, established an environment, and deployed your solution. Now, you're ready to embark on your Sitecore development journey.

Friday, November 10, 2023

Mastering Sitecore OrderCloud: A Comprehensive Guide to Sandbox Setup and Best Practices


Sitecore OrderCloud offers a powerful platform for e-commerce solutions, and getting started with a well-optimized sandbox environment is crucial for efficient development and testing. In this technical blog, we'll walk through the process of setting up a Sitecore OrderCloud sandbox and delve into best practices to ensure a seamless development experience.

1. Use the Sitecore OrderCloud Developer Tools.

Sitecore OrderCloud provides a number of developer tools to help you develop and deploy your applications. These tools include:

  • The Postman collection for Sitecore OrderCloud
  • The Sitecore OrderCloud documentation

2. Follow the Sitecore OrderCloud Coding Guidelines.

The Sitecore OrderCloud coding guidelines provide a set of best practices for developing Sitecore OrderCloud applications. These guidelines help to ensure that your applications are well-architected, maintainable, and scalable.

3. Use version control.

It is important to use version control when developing Sitecore OrderCloud applications. This will help you track changes to your code and revert to previous versions if necessary.

4. Test your applications thoroughly.

It is important to test your Sitecore OrderCloud applications thoroughly before deploying them to production. This will help to ensure that your applications are working correctly and that they are not causing any problems.

Apart from that, in terms or architecture below are some key highlights

How the Components Interact

When a user makes a request to the Sitecore OrderCloud API, the request is first routed to the API gateway. The API gateway then determines which backend service is responsible for handling the request and routes the request to that service. The backend service then processes the request and returns a response to the API gateway. The API gateway then returns the response to the user.

Benefits of the Architecture

The Sitecore OrderCloud architecture has a number of benefits, including:

Headless: The headless architecture allows developers to build custom front-ends that are tailored to the specific needs of their business.

Scalable: The architecture is highly scalable and can be easily deployed to cloud platforms like Amazon Web Services (AWS) and Microsoft Azure.

Secure: The platform is very secure and includes a number of features to protect data from unauthorized access.

Example of How the Architecture Can Be Used


Here is an example of how the Sitecore OrderCloud architecture can be used to build a custom e-commerce storefront:


Image Source -  Integrating Sitecore OrderCloud with Sitecore CDP

A developer would create a custom front-end that uses the Sitecore OrderCloud API to fetch product data, order data, and customer data.

The front-end would then use this data to display a product catalog, shopping cart, and checkout page.

When a customer places an order, the front-end would send the order data to the Sitecore OrderCloud API.

The API would then process the order and create a new order record in the database.

The customer would then be sent an email confirmation of their order.

Conclusion 

The Sitecore OrderCloud architecture is a powerful and flexible solution for building digital commerce applications. It is a headless architecture that allows developers to build custom front-ends that are tailored to the specific needs of their business. The architecture is highly scalable and can be easily deployed to cloud platforms. The platform is also very secure and includes a number of features to protect data from unauthorized access.

By following the best practices outlined in this blog post, you can develop and deploy Sitecore OrderCloud applications that are well-architected, maintainable, and scalable.

Saturday, October 21, 2023

Maximizing Sitecore XM Cloud: Unraveling Multisite Setup Options


Sitecore XM Cloud stands out for its unparalleled flexibility in managing multiple sites within its ecosystem. A critical decision in setting up multisite configurations is whether to employ a single head to serve multiple sites or deploy multiple heads to manage distinct sites. In this article, we'll delve into both options, highlighting their advantages, considerations, and best use cases.

Option 1: Single Head to Serve Multiple Sites

In this approach, a single Sitecore head takes on the responsibility of serving content to multiple sites. Each site shares the same backend infrastructure, reducing operational overhead and potentially minimizing costs.

Advantages:

  • Centralised Management: Maintenance and updates are streamlined as all sites operate within a unified instance.
  • Cost-Efficiency: Shared infrastructure can lead to cost savings in terms of resource utilization and hosting expenses.
  • Unified User Experience: Consistency in content management and administration interfaces facilitates a standardized user experience.

Considerations:

  • Scalability Challenges: As traffic and content demands increase, a single head might face scalability challenges, impacting site performance.
  • Customisation Limitations: Achieving distinct branding and feature sets for each site might be more challenging due to shared resources.
Implementation:- 

Sitcore has the build in plugin which can be used, here is the high level digram, taken from the Sitecore site just for the reference here.

Image source taken from the Sitecore -  The Next.js Multisite add-on
Full Implementation details can be found in above link, after doing the setup, when you run the application (Next.jss) app, it it will give a site reponse as a collection of all the sites.


Option 2: Multiple Heads to Serve Multiple Sites

In this scenario, each site is associated with its dedicated Sitecore head, providing autonomy in terms of content management and scalability.

Advantages:

  1. Scalability: Each site can scale independently based on its specific requirements, ensuring optimal performance.
  2. Customization Flexibility: Tailoring each site to its unique branding and functionality is more achievable with separate heads.
  3. Isolation: The independence of heads ensures that issues or updates on one site do not impact others.

Considerations:

  • Increased Management Complexity: Operating multiple heads necessitates additional management efforts for updates and maintenance.
  • Resource Utilisation: Separate heads might lead to increased resource utilization, potentially impacting hosting costs.
Implementation:- 

I used this aproach for one of our client, I belive that time we cound't find the option of Multisite plugin, we used multiple site in the solution.

Like 
1. Shared
2. Site1
3. Site2

We used NPM Workspace to share the content beetwen all the sites, to resolve the dependencies we used next-transpile-module and defined dependencies in packages.json 

Now, to access the shared site components, we used ComponentFactory.ts which is generated when we run a build.

My work colleague, David, has written an excellent blog post on a similar implementation. You can read it here: Headless Sitecore JSS Multi-site with NPM Workspaces


Best Use Cases

Single-Head Approach:

  • Ideal for scenarios where sites share similar content, branding, and features.
  • Suitable for small to medium-sized multisite setups with moderate traffic.

Multiple Heads Approach:

  • Recommended for multisite setups with diverse content, branding, and functionality.
  • Appropriate for larger-scale implementations where autonomy and scalability are paramount.

The choice between a single head serving multiple sites and multiple heads for distinct sites in Sitecore XM Cloud hinges on the specific requirements and characteristics of your multisite architecture. Carefully assess the unique needs of your organization, considering factors such as scalability, customization, and management efficiency, to determine the most suitable approach for your multisite setup.

Tuesday, October 3, 2023

Navigating Sitecore XM Cloud Prompts: Understanding Organization Tiers and Project Limits

Sitecore, a leading digital experience platform, empowers organizations to create seamless and personalized digital experiences. One of the essential features of Sitecore is the ability to organize projects into different tiers within the platform. However, users may encounter a limitation known as the "Organization Tier Project Limit," preventing them from adding more projects. In this technical blog, we'll delve into this issue, exploring its implications and offering potential solutions.

Understanding Organization Tiers:

Sitecore's organizational structure involves the use of tiers to categorize projects. The organization tier serves as the highest level, under which various projects are organized. Each tier represents a level of hierarchy within the platform, allowing for efficient management of digital assets, content, and configurations.

The Challenge: Project Limitation in the Organization Tier

Users often face a roadblock when attempting to add more projects to the organization tier. The platform imposes a project limit within this tier, hindering scalability for organizations with extensive digital initiatives. This limitation may stem from various factors, including licensing constraints, resource allocation, or architectural considerations.


Impact on Organizations:

The project limit within the organization tier can have significant implications for organizations aiming to expand their digital presence. As organizations evolve, they may require the ability to create and manage additional projects within Sitecore to accommodate new initiatives, campaigns, or product launches. The imposed limitation can impede agility and hinder the seamless execution of digital strategies.

Possible Solutions:

Review Licensing and Editions:

Ensure that your Sitecore license supports the desired number of projects within the organization tier. Different Sitecore editions may have varying limits, and upgrading to a higher edition might be a solution.

Optimize Existing Projects:

Evaluate the projects within the organization tier to identify opportunities for optimization. Removing redundant or obsolete projects can free up space for new initiatives.

Engage Sitecore Support:

If the project limitation persists, reaching out to Sitecore Support can provide insights into the specific constraints and potential solutions. Sitecore Support can offer guidance on best practices and assist in resolving licensing or configuration issues.

Conclusion:

The project limit within the Sitecore organization tier is a critical consideration for organizations seeking to scale their digital initiatives. By understanding the factors contributing to this limitation and implementing the suggested solutions, organizations can overcome challenges and continue leveraging Sitecore's powerful capabilities for creating compelling digital experiences. Regularly reviewing licensing, optimizing existing projects, and engaging with Sitecore Support are essential steps in ensuring a seamless and scalable digital experience platform.


Friday, September 15, 2023

Elevating Sitecore XM Cloud Development: Automating IIS Service Stop in Docker with Up.ps1


Efficient development workflows are essential for a seamless Sitecore XM Cloud experience, especially when working with Docker. In this blog post, we'll explore a simple yet powerful improvement to development efficiency by automating the stopping of IIS services using the Up.ps1 script in a Sitecore XM Cloud Docker environment.

Script

# Stop IIS Services

Write-Host "Stopping IIS Services" -ForegroundColor Green

try {

    # Attempt to stop IIS Service

    Invoke-Expression -Command .\scripts\StopIISServices.ps1

} catch {

    # Handle the exception if the script file doesn't exist or any other error occurs

    Write-Host "An error occurred: $($_.Exception.Message)" -ForegroundColor Red

    # You can add additional error handling or log the error here

}

Benefits

1. Time Savings:

Manually stopping IIS services can be time-consuming, especially during iterative development. Automating this process with the Up.ps1 script reduces downtime and accelerates the development cycle.

2. Consistency Across Environments:

Developers often work in varied environments. Automating the IIS service stop ensures consistency in the development process, irrespective of individual setups.

3. Error Handling:

The script incorporates error handling to gracefully manage scenarios where the StopIISServices.ps1 script is missing or if any other unexpected error occurs. This proactive approach helps developers quickly identify and resolve issues.

4. Integration with Docker Workflow:

This automation aligns seamlessly with Docker-based workflows. Whether starting or stopping containers, the Up.ps1 script becomes a central point for managing the development environment.

Implementation Steps

Ensure Proper Script Setup:

Confirm that the StopIISServices.ps1 script is correctly configured and present in the specified location.

Integrate with Docker Compose:

Incorporate the execution of Up.ps1 in your Docker Compose file. This ensures that the IIS services are automatically stopped whenever the development environment is brought up.

Conclusion

Automating the IIS service stop in Sitecore XM Cloud within a Docker environment significantly enhances development efficiency. By seamlessly integrating this functionality into the Up.ps1 script, developers can enjoy a smoother, more consistent, and error-resilient development experience. Consider implementing this enhancement in your Sitecore XM Cloud projects to streamline your Docker-based development workflows.


Here is the script for the reference -  https://drive.google.com/drive/folders/1kVrrFQiWnJ-sZT2uO3axEDPhuXALHy-_?usp=sharing

Thursday, August 10, 2023

Navigating Sitecore JSS Docker : Unpacking the "System Network Error (ambiguous (2 matches)" Conundrum and its Resolution


After reinstalling Docker, I encountered a familiar yet confounding error. While Docker is generally renowned for its reliability, this particular issue is relatively common. The error message in question pertained to network management, and I initially tried to address it through conventional Docker commands like listing and removing networks. However, my efforts proved futile, as I received an error message stating that the network was a "system network" and could not be deleted. Frustrated but undeterred, I discovered a remarkably simple solution that may prove helpful to other Docker users in a similar predicament - restarting my machine.

Understanding the Problem:

Docker users often create networks to facilitate communication between containers. These networks are the lifeblood of Docker's infrastructure, enabling the seamless exchange of data and services. However, the "system network" label signifies that a network is essential for Docker's core functionality and cannot be removed through conventional means. This can be a vexing problem for users trying to manage their Docker networks, as the error message seems to deny the basic action of network removal.

The Solution:

When faced with this issue, there are various suggested approaches to resolve it. However, one particularly straightforward and effective method is to restart your machine. Here's a step-by-step guide:

Save your work and close any active Docker containers or Docker-related applications.

Proceed to restart your computer or server.

Once the restart is complete, open Docker and attempt to delete the problematic network using the "docker network rm" command again:

docker network rm <network-id>

In most instances, you'll find that the network can now be removed without encountering the "system network" error message. The restart essentially resets Docker's internal state, resolving any underlying conflicts or issues that may have contributed to the error.

Conclusion:


The "system network cannot be deleted" error can be a vexing obstacle for Docker users. Still, as we've explored, a simple machine restart often proves to be a reliable and efficient solution. Docker is a powerful tool, but it's not immune to the occasional hiccup. Developing the know-how to troubleshoot and resolve such issues is a valuable skill for any Docker user, ensuring a smoother containerization experience.

Wednesday, July 12, 2023

Setup Postman collection for Order cloud

Introduction

Postman collections are essential for API development as they facilitate testing, documentation, collaboration, automation, and security testing. They help ensure API reliability and performance while enabling efficient team collaboration.

Sitecore Order Cloud offers a default set of APIs.

Steps to setup and access

Go to this Sitecore Postman collection, Here is the link to access it - OrderCloud API Exercise 


Click "Run" in Postman, which will provide you with the option to open the Postman collection in either your browser or the Postman desktop application.

It's advisable to establish a Postman team collection that's specific to the project, allowing for easy modification and sharing within the team.

It's a good practice to setup a new space and do the source control all the key API's and collection so this can be shred withing the team


Key Benefits:

  • Improved collaboration and knowledge sharing
  • Version control for consistent API development
  • Reusable components for faster development
  • Centralized documentation for easy access

Practices:

  • Create a dedicated Postman workspace for APIs
  • Integrate source control to track and revert changes
  • Use consistent naming conventions for clarity
  • Encourage regular updates to reflect API changes
  • Implement code review for quality and consistency
  • Establish documentation standards for clarity


Friday, July 7, 2023

Sitecore Xm Cloud - Navigating React Hooks: Addressing useEffect Missing Dependency Warnings and Escaping Quotation Marks

 Recently I got below error while building and deploying the XM Cloud project


 +00:00|INFO|114:5  Warning: React Hook useEffect has a missing dependency: 'facets'. Either include it or remove the dependency array.  react-hooks/exhaustive-deps

39:13  Error: `"` can be escaped with `&quot;`, `&ldquo;`, `&#34;`, `&rdquo;`.  react/no-unescaped-entities

  Error: `"` can be escaped with `&quot;`, `&ldquo;`, `&#34;`, `&rdquo;`.  react/no-unescaped-entities


to fix this issue for temprary I disabled below settings.

 "@typescript-eslint/no-unused-vars": "off",
    "@typescript-eslint/no-explicit-any": "off",
    "react/no-unescaped-entities": "off",
    "@next/next/no-page-custom-font": "off",

Wednesday, June 14, 2023

Fixing Package Installation Error: Version Conflict in Sitecore CLI

During the initial stages of building my Sitecore project using Bitbucket pipelines, I encountered a critical roadblock: a version conflict with the sitecore.cli package. The error message indicated that the manifest file already contained version 5.1.25, conflicting with the desired version, 5.2.113. To address this, a targeted fix involved updating the dotnet-tools.json file manually. In this technical account, I'll provide a detailed walkthrough of this fix.

The Issue: Version Mismatch in sitecore.cli

The error message "Cannot add package. Manifest file already contains version 5.1.25 of the package sitecore.cli" pinpointed a version conflict during the build process. The challenge was to rectify this conflict, ensuring alignment with the required version, 5.2.113.

The Fix: Updating dotnet-tools.json

1. Locate dotnet-tools.json

The first step was to navigate to the directory specified in the error message, typically /opt/atlassian/pipelines/agent/build/.config/. Here, the dotnet-tools.json file resides.

2. Open for Editing

Once located, I opened the dotnet-tools.json file for editing. This can be achieved through any preferred text editor or integrated development environment (IDE).

3. Update sitecore.cli Version

Within the file, I identified the entry for sitecore.cli and manually updated the version number to 5.2.113. This involved changing the existing version, usually set at 5.1.25, to the required version.

4. Save Changes

After making the necessary adjustment, I saved the changes to the dotnet-tools.json file, ensuring that the updated version number for sitecore.cli was persisted.

5. Retry Package Installation

With the file updated, I retried the package installation process. The purpose was to confirm that the correct version, 5.2.113, was now being utilized without encountering the previous version conflict.

6. Verify Compatibility

Before concluding the fix, it was imperative to verify the compatibility of version 5.2.113 with the project's requirements. This involved checking for any additional dependencies or behavioral changes.

Conclusion

By strategically editing the dotnet-tools.json file, specifically updating the version of the sitecore.cli package, the version conflict was successfully resolved. This targeted fix allowed for a seamless build process, ensuring that the correct version was utilized during the Sitecore project development within Bitbucket pipelines. The manual edit of the manifest file provides a precise solution for version conflicts, demonstrating the power of nuanced adjustments in the development workflow. As always, adapt these steps to your specific scenario and leverage the broader development community for insights and collaboration. Happy coding!

Friday, June 9, 2023

Unleashing the Power of Sitecore OrderCloud: A Technical Deep Dive


Introduction:

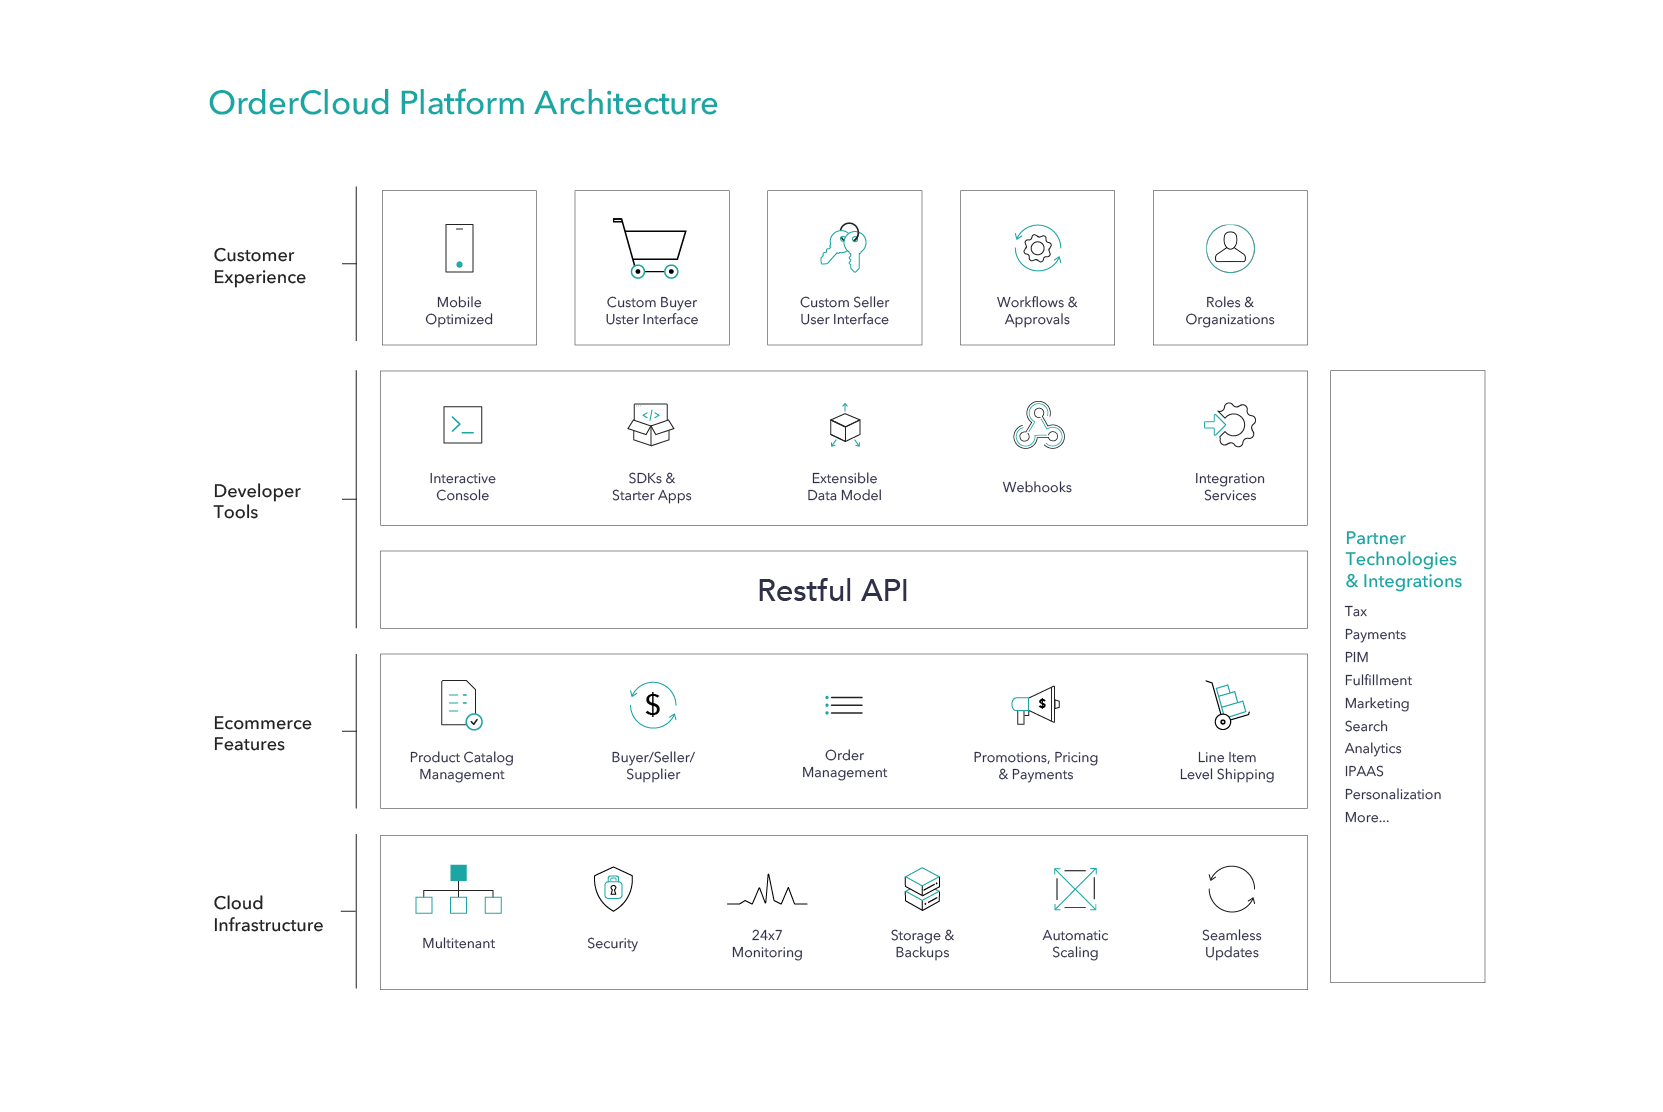
Embark on a technical journey into the heart of Sitecore OrderCloud, a robust e-commerce solution seamlessly operating on Microsoft Azure. In this blog post, we explore its microservices architecture, integration points, compliance features, and the intricacies of every interaction through the OrderCloud API. Let's dive in.

Image Source - Sitecore Order Cloud

Microservices Architecture and Cloud-Native Approach:

OrderCloud leverages a microservices architecture, embracing the scalability and flexibility offered by cloud-native solutions. We'll dissect the layers of its architecture, exploring how each microservice contributes to the platform's agility.

Integration Points:

Explore the diverse integration points that make OrderCloud a powerhouse in the e-commerce landscape. From data synchronization to third-party service integration, we'll unravel the seamless connectivity that ensures a cohesive e-commerce experience.

Webhooks and Integration Events:

Delve into the world of webhooks and integration events, crucial components for real-time communication and data synchronization. We'll discuss their role in maintaining a synchronized ecosystem, enabling timely updates and actions across the OrderCloud platform.

Security and Compliance:

OrderCloud's commitment to security is evident in its annual SOC 2 Type 2 audits. We'll explore the platform's compliance with GDPR and CCPA, ensuring that businesses using OrderCloud can confidently navigate the complex landscape of data protection and privacy regulations.

User Context in API Interactions:

Uncover the importance of user context in every interaction with the OrderCloud API. We'll discuss how this user-centric approach enhances security, personalization, and overall user experience within the e-commerce ecosystem.

Conclusion:

In this technical exploration, we've scratched the surface of Sitecore OrderCloud's capabilities. From its microservices architecture to robust integration points and unwavering commitment to security and compliance, OrderCloud stands as a testament to the evolution of e-commerce on the cloud. As businesses navigate the digital landscape, understanding the technical intricacies of platforms like OrderCloud becomes paramount for success.

Wednesday, May 17, 2023

Troubleshooting and Resolving Sitecore XM Cloud Deployment Issue: Rendering Host Build Failed


In this blog post, learn how to identify and resolve problems lurking in your code, like unused variables. We'll explore my personal encounter with this challenge and discuss alternative solutions, including the power of configuration tweaks to disable specific features. Uncover the secrets of efficient debugging and enhance your coding prowess today

"no-unused-vars": "off"
Troubleshooting Steps

Check ESLint's output for "no-unused-vars" warnings. Identify which variables are reported as unused.
Update TypeScript File:

In your TypeScript file, address the warnings by either using the variables or 
removing them if unnecessary.
ESLint Configuration:

Ensure your ESLint configuration includes proper TypeScript rules. Adjust the "no-unused-vars"
rule to match your project's requirements.


After updating the TypeScript file and ESLint configuration, re-run ESLint to verify that 
the "no-unused-vars" issues are resolved. By updating the TypeScript file and configuring ESLint
appropriately, you can quickly resolve "no-unused-vars" issues 
and maintain a clean and efficient codebase.

Saturday, April 8, 2023

Resolving the "No CORS Policy Found" Error in Sitecore 10.3 Identity Server


Encountering the Sitecore Identity Server error, specifically the "No CORS policy found for the specified request" issue, can be a frustrating experience for developers and administrators. In this blog post, we'll delve into the details of this error and provide a practical solution to address it.

Error Details:

The error message points to a problem with the CORS (Cross-Origin Resource Sharing) policy, specifically when the request origin is set to "null," indicating that it doesn't have permission to access the resource. The log entries show the execution of the relevant endpoint in the Identity Server, followed by an unhandled exception related to a SQL Server connection issue.

Error Log:

(Sitecore Identity/AA0001) Request origin "null" does not have permission to access the resource.

(Sitecore Identity/AA0001) No CORS policy found for the specified request.

(Sitecore Identity/AA0001) Executing endpoint '"Sitecore.Plugin.IdentityServer.Controllers.AccountController.Login (Sitecore.Plugin.IdentityServer)"'

[INF] (Sitecore Identity/AA0001) Route matched with "{action = \"Login\", controller = \"Account\"}". Executing controller action...

[INF] (Sitecore Identity/AA0001) Executed action "Sitecore.Plugin.IdentityServer.Controllers.AccountController.Login (Sitecore.Plugin.IdentityServer)" in 16964.3894ms

[ERR] (Sitecore Identity/AA0001) An unhandled exception has occurred while executing the request.

System.Data.SqlClient.SqlException (0x80131904): A network-related or instance-specific error occurred while establishing a connection to SQL Server...

 ---> System.ComponentModel.Win32Exception (2): The system cannot find the file specified.

Solution:

To address this issue, follow these steps:

Investigate the CORS Policy:

Check your Sitecore configuration and ensure that the CORS policy is correctly configured to allow the specified request origin. Review Sitecore documentation and relevant articles to verify the proper CORS setup.

Review External Resources:

The provided Sitecore Stack Exchange link (https://sitecore.stackexchange.com/questions/19242/what-does-this-error-message-in-the-identity-server-logs-mean) can offer valuable insights into similar issues. Explore discussions and solutions from the community.

Check SQL Server Services:

In the presented solution, the root cause was identified as SQL Server services not running. Validate the status of your SQL Server services and restart them if necessary. Ensure that SQL Server is configured to allow remote connections and that the instance name is correct.

Conclusion:

Resolving the "No CORS policy found for the specified request" issue in Sitecore Identity Server involves a comprehensive approach. By investigating the CORS policy, reviewing external resources, and addressing potential SQL Server service issues, you can successfully mitigate this error. Remember to adapt these steps based on your specific environment and configurations.


Monday, March 6, 2023

Overcoming Sitecore CLI Plugin Installation Hurdles: Resolving "dotnet-tools.json came from another computer and might be blocked" Error in Sitecore JSS


When installing Sitecore CLI Plugins, you may receive the following error:


File .config\dotnet-tools.json came from another computer and might be blocked to help protect this computer. For more information, including how to unblock, see https://aka.ms/motw

This error occurs when the .NET tool installer detects that the dotnet-tools.json file is from a different computer. This is a security feature to help protect your computer from malicious code.

Solution

To fix this error, you can take the following steps:

Back up the dotnet-tools.json file.

Recreate the dotnet-tools.json file.

Update the content of the dotnet-tools.json file to include the Sitecore CLI Plugins that you want to install.

Run the following command to install the Sitecore CLI Plugins:

dotnet tool install sitecore.cli

Example


# Back up the `dotnet-tools.json` file

copy dotnet-tools.json dotnet-tools.json.backup


# Recreate the `dotnet-tools.json` file

new-item -itemtype file -path dotnet-tools.json


# Update the content of the `dotnet-tools.json` file

$tools = @{

    {

        "name": "Sitecore.CLI",

        "version": "5.1.25"

    }

}


Out-File -FilePath dotnet-tools.json -InputObject $tools -Encoding ascii

# Install the Sitecore CLI Plugins

Conclusion

Once you have followed these steps, you should be able to install the Sitecore CLI Plugins without any errors.