Saturday, September 23, 2017

Sitecore Commerce 8.2.1 -How to rebuild all catalogs

Here are simple steps to rebuild the commerce catalog.

Please check that your local catalogue service is up and running.


Sample function to run the rebuild.

public TaskResults Run()
        {
            var context = CatalogContext.Create(new CatalogServiceAgent("https://tests.csservices.dev.local/Test_CatalogWebService/CatalogWebService.asmx"));

            var rebuildProgress = context.RebuildAllCatalogs(true);

            // 30 second refresh interval.
            const int refreshInterval = 30000;
            // Monitor the progress of the import operation.
            while (rebuildProgress.Status == CatalogOperationsStatus.InProgress)
            {
                System.Threading.Thread.Sleep(refreshInterval);
                rebuildProgress.Refresh();
                Log.Info(string.Format("Rebuilding {0} in progress...", rebuildProgress.CatalogName));
            }

            if (rebuildProgress.Status == CatalogOperationsStatus.Failed || rebuildProgress.Status == CatalogOperationsStatus.CompletedWithErrors)
            {
                foreach (var error in rebuildProgress.Errors)
                {
                    Log.Error(string.Format("Error message: {0}", error.Message));
                }
            }

            if (rebuildProgress.Status == CatalogOperationsStatus.Failed)
            {
                return TaskResults.Fail;
            }


            return TaskResults.Succeed;
        }

Tuesday, September 19, 2017

Setup iPhone8 simulator for Sitecore experience editor

It's really a cool feature to view your content in the latest simulator, it's very simple, follow the below steps and enjoy.
First, I would like to provide quick details about Sitecore Simulator then will provide quick steps to set up the iPhone8 simulator for the Sitecore experience editor.
Path for the simulator in Sitecore- /sitecore/layout/Simulators
Where you can use this through the experience editor.
Go to preview mode and your default site will look like below, If you are in the experience editor mode click on the edit mode.
Your screen will look like this: -
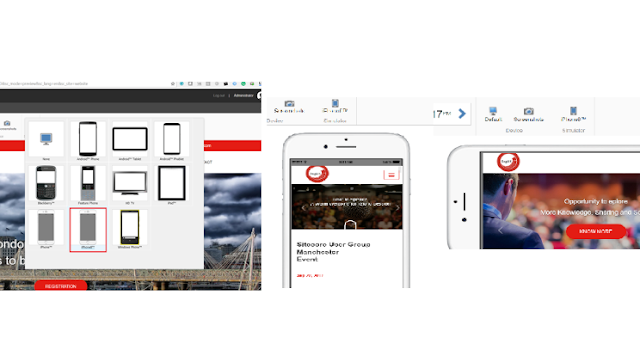
Click on the None button to choose the desired simulator.
Let’s select an iPhone
The view will look like this.
You can use the Rotate button to change from portrait to landscape.

Now, Let’s go and customize your own viewport for the device simulator.
Will create a new simulator and customize this.
Duplicate the existing simulator, Let’s give it a name iPhone8
This will look like this –

User-agent is the default browser setup, we are not going to change this here, this looks same for Sitecore 8.1 and 8.2.
Change the background image for iPhone 8
Go to the path: - /sitecore/media library/System/Simulator Backgrounds/iPhone.
Will add two images here – Kindly change your images based on the need.
Here I have set up this simulator for 375 * 812
Create duplicate items of iPhone and iPhone Landscape and provide the name like iPhone8 and iPhone8_Landscape.
Click on attach and choose your file –
Now, go to the simulator and change the background image from there.
Change this to the landscape also, here are the steps.
Click on browse and select the newly uploaded image. I have highlighted the new dimension for the new simulator
Change the screen height and width in the simulator section based on your design. That’s it, now go to experience editor and enjoy.
Preview comparison for existing and new iPhone Setup.

Hope this post will be helpful, please share your feedback here

Thursday, September 14, 2017

Sitecore Practical Series-5 - Setup layout, sublayout and rendering- key consideration.

The layout is a first window or entry point for the page, For creating any page it's recommended to define one layout.

Layout:-
  1. This is an outer and first part of the HTML.
  2. Most of the structure related items should be there like Head section.
  3. One page one layout but for preview purpose, multiple preview version can be configured.
  4. Options available for  WebForms (.aspx) and MVC (.cshtml)

This is like a master page in the web form application and in MVC it's like Views\Shared\Site.master

Sitecore location for the layouts-


Create your first layout for the site, Here you need to consider your information architecture, We are considering all possible scenario like multisites, custom components, and custom layouts.

First, create a folder for your main site and consider multisite setup


There are two options to define your layouts - one for web form based layout and second for MVC, We will be using here MVC layout.

Now create a folder for the Main site, site1 and site 2 then define MVC layout for the Main site.


Let's give it a name - HomeLayout

Select the location of the layout.


#SitecorePoint - Here we have to choose the location, Although we clicked on the selected folder, on this screen, Ideally it should default provider selection for the selected folder, instead of developer choose this item or location again.

Ok, Let's move forward.

Now at this position, we have to define where in the code/solution we want to save this layout.

Tip# Make sure our project structure and this structure should be the same to avoid the problem later.


If your project folder structure is different with the above path then please update the location here,

We have created below folder structure in the project solution, So we must need to update the path.


Update the path in the Sitecore and this will look like this

Publish the site, After the publish verify the location of deployed layout


Verify to the Sitecore virtual directory that this page has been moved there or not?

it should look like below


Layout:-
  1. Sub part of the main layout and parent of components.
  2. This is only applicable for web forms.
  3. Multiple sub layouts can be created within the placeholder.
  4. It's like dot net user control - .ascx
  5. available for  WebForms (.aspx) and MVC (.cshtml)
Note:- As this is only compatible with Webform hence we are not using this anymore


Rendering - 

This is the main section where actual site content will be rendered, there are several options within the rendering.

Controller rendering - This rendering will be based on controller and action name, in short, it will call a call file and that will run some logic or may invoke view itself.

View rendering - .chstml file can be directly plugin and can be executed.

Default section


Let's create some folder structure for the sample rendering.

Available options for the renderings.


  1. XSL Rendering - This is one of the oldest rendering in Sitecore, I rember in past this was using to render the items through XSLT, it's required a good understanding of XSLT to render the items.
  2. WebControl - Mostly used for the web form - We will not be using here.
  3. Method Rendering -Will discuss this in advance topic.
  4. URL Rendering - Will discuss this in advance topic.
  5. Controller Rendering - Controller can be defined and used here.
  6. Item Rendering - Will discuss this in advance topic.
  7. View Rendering - MVC view can be use here to render the view.

Sunday, September 10, 2017

Sitecore Practical Series-4 - Sitecore Command Templates (Branch Template not Menu) Implementation and key consideration.

Overview-

1. What is Sitecore Command Tempaltes - Understanding.
2. Why Sitecore Command Tempalte required and some use cases.
3.  A sample POC to implement the Command template.

Let's start, Ok

Command templates- basically this feature allow to add logic like how item will be inserted/created when you create item through the command tempalte, but  in case of branch template there were pre defined setup rule/configuration.

While creating item throug command tempalte - it will call a class and defined function where we can add aditional logics.

Steps-

1. Open sitecore and go to the path- /sitecore/templates/Branches/


2. Right click and create a new Command Tempalte - Let's say give it a name - ArticleCommand


Saturday, September 9, 2017

Fix for the type 'ILog' exists in both 'Sitecore.Logging, Version=1.2.0.30715, Culture=neutral, PublicKeyToken=null' and 'log4net,

I am sure while implementing custom logger you must faced this type of error.

To resolve this issue - Simply remove reference of Log4Net from the project.

As Sitecore.Logger already have refernece for this dll

Ref.


After removing the reference of log4net it will work, PFA


Friday, September 8, 2017

Sitecore Practical Series-3 - Branch Template Implementation and key consideration.

Branch tempalte is basically a predefined collection of some items (every thing within a sitecore is an item).- though branch tempalte a collection of sub item can be dfined and whenever user will create a new items based on branch tempalte it will create the predefined collection.

Path:- /sitecore/templates/Branches


Create a new folder based on the project structure and information architecture


Theare are three options available to create withing branch tempalte.

1 - New branch - this will provide option to club existing tempalte and will provide a coolection of items and will be used as a single item.
2.  Command Template -  This template is different with branch tempalte and provide more flexibility, basically this tempalte will define a class and method and that will be called during insertion of item, this basically reference Sitecore UI command to invoke wizards or other custom logics
3.  Branch folder - basically this will allow to create a new folder and that folder itself will have insert option to again choose these three options.


Practical -

1. Create sample two tempalte into the root. One we have already created in the previous session.

I have created a new tempalte called - Chunk


Now, go to branch tempalte and create a new branch - Select Article as a main item.


this will look like this-

Now create a new folder withing article folder


Make sure this newly created folder comes under the &name(Article), details


Now to content section and choose this branch tempalte to create a items ( For this session purpose we are planning to use this branch tempalte directly thorugh browse, ideally it should come once you right click - for that we need to setup inseert option on standard tempalte.


Here is the result.

Sitecore Practical Series-2 -Understanding SitecoreTemplate structure and best practices.

Understanding SitecoreTemplate structure and best practices.


Template - 'This is basically a structure to store the content, like designing a table.

In the previous session - 


  1. We have covered how to setup visual studio 2017 and key features:- http://jitendrasoni.blogspot.co.uk/2017/03/visual-studio-2017-quick-intro-and-walk_19.html
  2. We have covered how to setup development machine - Including Visual Studio 2017, Sitecore, Rock etc.http://jitendrasoni.blogspot.co.uk/2017/08/sitecore-practical-series-1.html

This would be the third steps to understand the Sitecore template, sections, fields, fields type and some key features.

Let's start.

1. Login into Sitecore and go to template section


Create a new folder at the root level.

Tip#1 - Make sure while defining the first folder for the project, It should be considered at the root and have all multisite, components and settings inside to this.

Here, I am giving this a name - MainProject


While creating a template there will be three options, As mentioned below.


Define a high-level folder structure for your site.

Tip#2 - Before creating a basic IA design, Please do a home work like how you are planning to structure your site.
Tip#3 Befo Either you can use a UML design for the reference or use excel sheet to design the template and relationship for base and section

Basic folder structure will look like this.

More details will cover in next advance section.


As I said this is totally it depends on your project need, You can also consider #Habitat and Helix structure for the reference.

Let's design the first template here.

Add a new template, here you will get the option to create a new or choose based on the existing.


Tip#4 Before  Never user Sitecore standard template directly to your side, it should be first driven to the base temple and your base template should be used for the base template, this will always be a good practice, will discuss pros and cons in advance section.

Select the location where you want to store the template. Click Next to create the template.


Add section and fields in the template


Field types details-

All field type details are available here:- https://sdn.sitecore.net/Articles/Media/Referencing%20Binary%20Items/Field%20Types.aspx

Tip#5 - Define Title name, display name, and breadcrumb in a separate field, As some time item name may be different from these fields, Default setup these fields value through the tokens.

Tip#6 - Avoid using heavy field type like RTE, this may affect the load time for the content

 Tip#7 -  Use icon for the template

Details around builder, inheritance, and content.


Inheritance section.


Choose icon

Updated icon-

This icon field and other related fields get stored in the content section,


There are other sections in the standard template like security and statics those are very helpful to quickly review access control and track audit.

 Tip#8 -  How to move section positions- this needs to be done through the tree node.


Now, We have created a template - let's understand the other settings while defining the fields.

Shared: If this is checked then the same value will occur for every numbered version in all supported languages. 
Unversioned: If this is checked, the field has the same value for every numbered version within a language.

Setup standard template here, this is very useful to define some rules like tokes.( tokes are nothing but predefined setup at field level so that will automatically get value assigned based on the user inputs)/.


How to define - Click on the standard template and assign the below token based on the needs


  1. $name: The name for the new item entered by the user
  2. $id: The ID of the new item
  3. $parentid: The ID of the parent of the new item
  4. $parentname: The name of the parent of the new item
  5. $date: The system date in YYYY-MM-DD format
  6. $time: The system time in HHmmss format
  7. $now: The system date and time in yyyyMMddTHHmmss format


Branch template-

Use this feature wherever it's required that if every time an item gets created there is some predefined values to fill in.